Sharp Cooking app can currently import recipes directly from websites and backup files, making it easy to create a personal collection of recipes. However, it does not currently provide an option to scan recipes from a book or an image. This has been a long-requested feature that I am now attempting to add to the app, and will document the experience in this post.
How?#
The first thing that comes to mind when trying to extract text from images is OCR. Modern OCR is in fact a type of Artificial Intelligence (AI), usually under the branch of Machine Learning (ML). There are quite a few options available to perform this task. In particular, I reviewed options that could be directly integrated into Sharp Cooking app or API.
Tesseract OCR#
The first option evaluated was Tesseract OCR which is an open source project that has been around for a long while. Tesseract is available as a command line utility, so a wrapper may be needed to use it in some languages. I tried the pytesseract to use Tesseract with Python in the Sharp Cooking API. For pytesseract to work, it needs Tesseract to be installed and a path to the executable needs to be provided. This is a problem as Azure Functions do not give much control over the platform it runs on. It is possible to run the function in a container which would allows this problem to be fixed, but I figured it would be best to look into the other options first.
tesseract.js#
tesseract.js is a javascript port of the Tesseract OCR engine. It is able to run in the browser or node.js environments by using a WebAssembly version compiled from the original Tesseract project. Using tesseract.js in Sharp Cooking is very easy:
 1
 2
 3
 4
 5
 6
 7
 8
 9
10
11
12
13
14
15
16
17
18
19
20
21
22
23
24
25
26
| // Import Tesseract object
import Tesseract from 'tesseract.js';
import { fileOpen } from "browser-fs-access";
// Prompt the user to pick a file
const filePicked = await fileOpen({
mimeTypes: ["image/*"],
});
// Invoke Tesseract recognition
const result = await Tesseract.recognize(
filePicked,
'eng',
// In case you want to log the internals of the recognition
{ logger: m => console.log(m) }
);
// while there are many options inside result.data
// we use the text property
for (const item of result.data.lines) {
// Do a bit of cleanup. In this case, keep only a-z A-Z _ - 0-9 . characters
let clean = item.text.replace(/[^a-zA-Z_\-0-9 \.]*/, '').trim();
// add the clean line to a result collection
importItemsDisplay.value.push({ isSelected: false, text: clean });
}
|
The results for a good picture are fairly good. For this image:
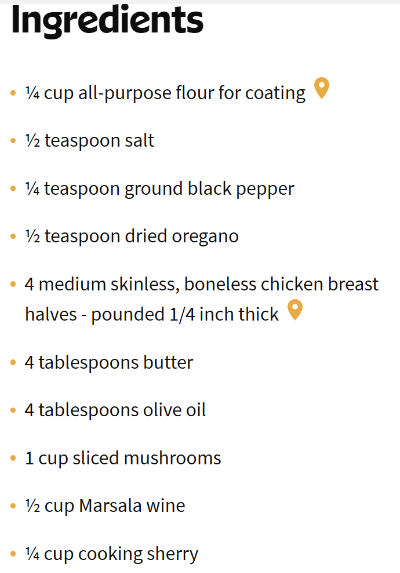
It will extract the following text:
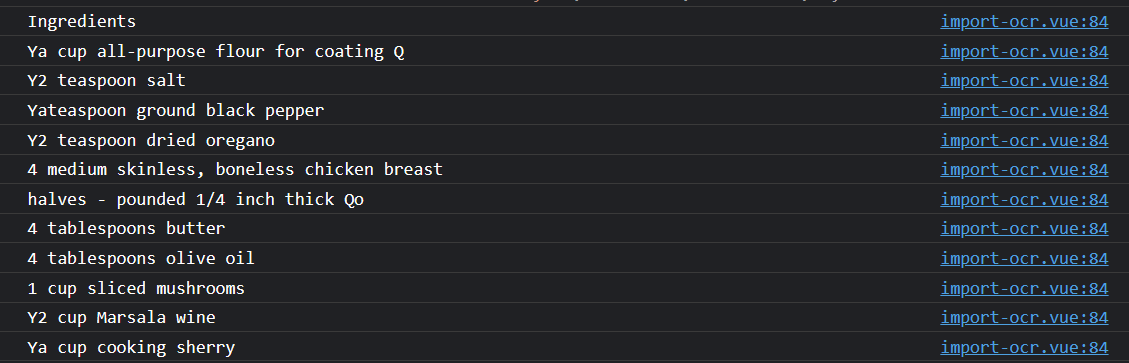
Note how some characters are not recognized like ¼ and ½, but 1/4 is recognized just fine.
While the code in here is simply pulling the raw text, the json returned contains a lot more information. For instance, it returns bounding boxes for blocks, paragraphs, lines, etc. Later, we will discuss how the extra information can be useful.
Azure Computer Vision#
Azure Computer Vision is an Azure offering for a few key services including OCR. It requires an Azure account to leverage this service, but it does offer a free tier. As of writing, the free tier gives 20 transactions per minute and 5000 transactions per month for free.
There are both SDKs and REST APIs you can use to consume Azure Computer Vision. The snippet below is from the Sharp Cooking API using python to connect to Azure computer Vision REST API:
 1
 2
 3
 4
 5
 6
 7
 8
 9
10
11
12
13
14
15
16
17
18
19
20
21
22
23
24
25
26
27
28
29
30
31
32
33
34
35
36
37
38
39
40
41
42
43
44
| def main(req: func.HttpRequest) -> func.HttpResponse:
try:
for file in req.files.values():
# read the input file as bytes
contents = file.stream.read()
if not file.content_type.startswith("image"):
return func.HttpResponse("Only image files are accepted", status_code=400)
# Because we will post bytes, we use the content-type
# application/octet-stream
headers = {
'Content-Type': 'application/octet-stream',
'Ocp-Apim-Subscription-Key': 'AzureKey',
}
params = urllib.parse.urlencode({
'language': 'unk',
'detectOrientation': 'true',
'model-version': 'latest',
})
# the URL depends on the location of the service
url = "https://centralus.api.cognitive.microsoft.com/vision/v3.2/ocr?%s" % params
response = requests.post(url, contents, headers=headers)
data = response.json()
# parse the json and get the text
result = []
for region in data["regions"]:
for line in region["lines"]:
returnLine = ""
for word in line["words"]:
returnLine += f" {word['text']}"
result.append(returnLine)
logging.info(result)
return func.HttpResponse(json.dumps(result), status_code=200, mimetype="application/json")
return func.HttpResponse("A single file is required to process", status_code=400)
except Exception as e:
return func.HttpResponse("The image file is invalid", status_code=400)
|
Uploading the same image used tesseract.js will yield the following result:
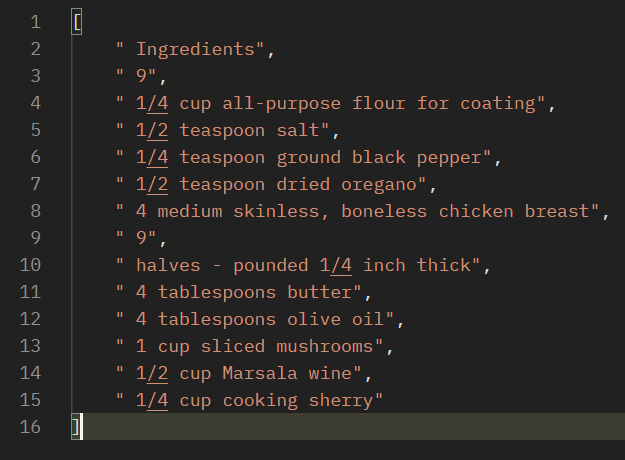
In a broader test, Azure outperformed tesseract.js overall. It recognized a greater variety of character and font types, including Unicode fractions.
You may be wondering why not call Azure Computer Vision directly from the SPA app, given that it is a REST API. The issue is that the SPA app code is publicly exposed, so there is no reasonable way to protect the Azure Key. That’s why the Python API was used instead. The API is hosted in Azure Functions which allows for configuration or Key Vault to secure the keys.
Note that the example shown here is simplified, Azure also offers bounding boxes and a lot more useful information.
Interpreting the data#
I now have two good ways to read information out of the image. But how to convert the extracted text into recipes? It is expected that users will mainly use this feature to scan printed recipes or those from books. However, there is no standard format for these recipes. Reading from top to bottom may create out of order steps. Ultimately, I think the user will have to pick out the various pieces of the recipe and recreate it within the app. I just need to make that process as easy as possible.
The rough outline of the process is as follows::
- The user will scan one image at a time.
- After scan, the detected lines will be highlighted with bounding box information from the OCR engine.
- The user will then be prompted to select the highlighted lines for ingredients and instructions.
Drawing the boxes in the loaded image#
For the sake of simplicity, I will use tesseract.js instead of Azure Computer Vision.
In order to draw the bounding boxes, I used a canvas:
1
| <canvas ref="preview"></canvas>
|
The uploaded image is drawn onto the canvas:
 1
 2
 3
 4
 5
 6
 7
 8
 9
10
11
12
13
14
15
16
17
18
19
20
21
22
23
24
25
26
27
28
29
30
31
32
33
34
35
36
37
| const filePicked = await fileOpen({
mimeTypes: ["image/*"],
});
// preview is the canvas ref within the vue component
const canvasContext = preview.value.getContext("2d");
const bg = new Image();
// The image is loaded as a blob first
// then it is loaded onto the Image as a base 64
// the blobToBase64 is ommitted to keep this shorter
bg.src = await blobToBase64(filePicked);
bg.onload = function () {
const imgWidth = bg.width;
const imgHeight = bg.height;
const ratio = imgWidth / imgHeight;
// To ensure the image is never too big
// resize it to width 400 and respect the
// aspect ration for height
const newImgWidth = 400;
const newImgHeight = 400 / ratio
// When we draw the boxes onto the image
// we need to know the resizeRatio so that we
// can appropriately recalculate the x, y, w, h
// of the box
resizeRatio = newImgWidth / imgWidth;
// resize the canvas itself
preview.value.width = newImgWidth;
preview.value.height = newImgHeight;
// Draw the image starting on position 0,0
// and use the new size
canvasContext.drawImage(bg, 0, 0, newImgWidth, newImgHeight);
};
|
Run the tesseract.js recognition:
1
2
3
4
| const result = await Tesseract.recognize(
filePicked,
'eng',
);
|
Draw the bounding boxes around recognized text in the canvas:
 1
 2
 3
 4
 5
 6
 7
 8
 9
10
11
| // for simplicity, we are only drawing the
// bounding boxes of lines here.
for (const item of result.data.lines) {
// convert and store the resized coordinates
const line = convertBoundingBoxToResizedRectangle(item.bbox, item.text);
ocrResult.value.push(line);
// draw only the lines of the rectangle. Don't fill it.
canvasContext.strokeStyle = "red";
canvasContext.strokeRect(line.x0, line.y0, line.w, line.h);
}
|
The convertBoundingBoxToResizedRectangle function looks like this:
 1
 2
 3
 4
 5
 6
 7
 8
 9
10
11
12
13
14
15
16
17
18
19
20
21
22
23
24
| function convertBoundingBoxToResizedRectangle(boundingBox: {
x0: number;
y0: number;
x1: number;
y1: number;
}, text: string) {
// Since we already have the resizeRatio saved from before
// and we know that the resizeRatio for Width and Height
// are the same thanks to the aspect ratio being maintained
// we simply multiply x0, y0, x1, and y1 by the resize ratio.
// Before we do the same to height and width, we first need
// to derive them by getting the distance between x1 and x0
// then y1 and y0. We also store the text so we can later
// lookup the converted values directly
return {
x0: boundingBox.x0 * resizeRatio,
y0: boundingBox.y0 * resizeRatio,
x1: boundingBox.x1 * resizeRatio,
y1: boundingBox.y1 * resizeRatio,
w: (boundingBox.x1 - boundingBox.x0) * resizeRatio,
h: (boundingBox.y1 - boundingBox.y0) * resizeRatio,
text: text
};
}
|
A resulting image would look like this:

Selecting text in bounding box#
To detect whether there is text in the area and move it to the recipe when the user clicks within the canvas, we first need to add a click event to the canvas:
1
| <canvas @click="selectItemInCanvas" ref="preview"></canvas>
|
Now we compare the click coordinates with the bounding boxes from the OCR engine. If the clikc was within a recognized text box, we use the text:
 1
 2
 3
 4
 5
 6
 7
 8
 9
10
11
12
13
14
15
16
17
18
19
20
21
22
23
24
25
26
27
28
29
30
31
32
33
34
| function selectItemInCanvas(event: MouseEvent) {
const canvasContext = preview.value.getContext("2d");
// look through the originally stored OCR result
// to find if the offsetX and offsetY of the click
// is within any bounding boxes. The offset properties
// make sure the coordinates are relative to the
// canvas 0,0 position.
const found = ocrResult.value.filter(item =>
event.offsetX >= item.x0 &&
event.offsetX <= item.x1 &&
event.offsetY >= item.y0 &&
event.offsetY <= item.y1
);
// We are assuming, probably incorrectly, that
// there won't be overlaps. So, we pick the first
// matched box
if (found && found.length == 1) {
const item = found[0];
// We draw another rectangle on top of the original
// with a different color to mark this box as selected
canvasContext.strokeStyle = "blue";
canvasContext.strokeRect(item.x0, item.y0, item.w, item.h);
// Remove any undesired characters from the text and store
// the result
let clean = item.text.replace(/[^a-zA-Z_\-0-9 \.]*/, '').trim();
importItemsDisplay.value.push({ isSelected: false, text: clean });
} else {
console.log(`found nothing`);
}
}
|
A working example#
While simple and mostly unpolished, the example below demonstrates all the previously discussed pieces working together.
Conclusion#
There is still some work to be done in the app before I publish a version with OCR. If anything relevant changes I will either update this post for minor changes or create a new one for anything major.